Inbox
What is Inbox?
The Inbox is the primary workspace for agents to handle customer conversations in real time. It's where incoming cases are received, attended, and resolved across multiple channels like WhatsApp and Webchat.
- Purpose: Provides agents with a centralized interface to manage all customer interactions transferred from the bot, ensuring efficient case handling and timely responses.
- Value: Streamlines agent workflow by consolidating all cases in one place, displaying critical information at a glance (SLA status, customer details, case history), and providing tools for quick resolution. This reduces context switching and improves response times.
- Scope: Inbox is one of the core sections of the Helpdesk ecosystem (alongside Case Archive and Realtime Dashboard). It's the operational hub for day-to-day agent work and integrates with Project/Queue configurations and AI Copilot features.
Roles and Visibility:
Three distinct roles with different levels of access:
- Admin: Has complete visibility over the entire organization, all projects, and all queues. Can configure global settings and manage all users.
- Manager: Has admin-level visibility over all assigned projects and their respective queues. Can access project/queue settings, manage assigned agents, and configure SLA thresholds for their domains.
- Agent: Has visibility only over the queues to which they are assigned. Can handle cases, view queue-specific information, and access cases within their scope.
How to use it?
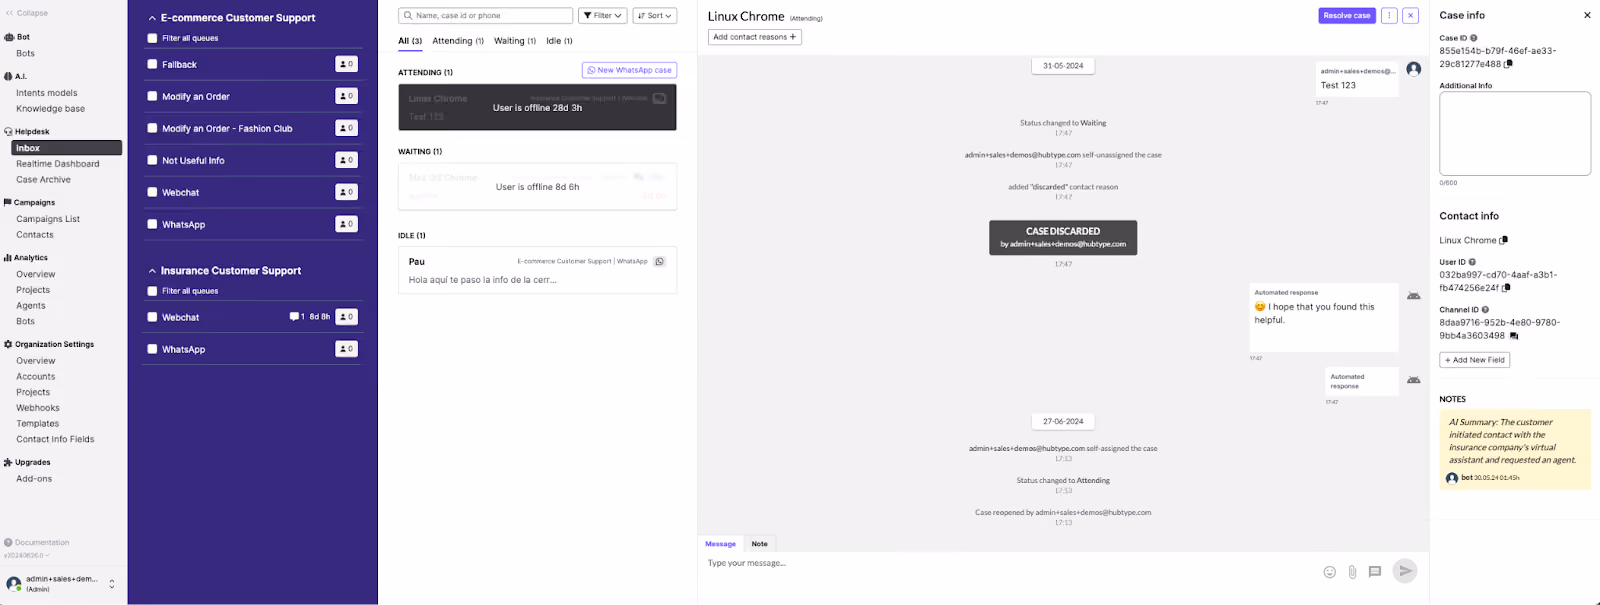
The Inbox interface is divided into three main columns:
- Projects and Queues Column
This column displays the organizational hierarchy and provides access to settings:
For Agents:
- View all assigned queues grouped by projects
- Expand/collapse queue lists to focus on specific areas
- See case waiting counts per queue at a glance
- Apply filters to narrow down visible cases
For Managers/Admins:
Access Project Settings (gear icon) to configure:
- SLA thresholds (Orange, Red, and SLA Target)
- Auto-assignment rules
- Case lifecycle rules (reopening, IDLE, discard thresholds)
- Concurrency and availability limits
- Advanced features
Manage Queue Settings to:
- Assign agents to specific queues
- Configure queue-specific parameters
- Set queue priorities
- Set queue open/close schedule
Create and edit Contact Reasons for case typification
View and modify organizational structure
2. Messages Column (Center)
The messages column is organized by case status tabs: Waiting, Attending, and Idle.
Key Features:
- Search functionality: Find cases by user name, case ID, or phone number
- Filter options: Apply filters by project, queue, channel, or date range
- Create new case: Manually initiate a WhatsApp conversation with a customer
- Sort options: Order cases by waiting time or creation date
Message Preview Cards show:
- Customer name (or alias)
- Message preview (first line of text)
- Project and queue name
- Channel icon (WhatsApp, webchat, etc.)
- Case type indicator ("New" or "Started")
SLA timer with colored status bar:
- Green: Within acceptable response time
- Orange: Approaching Orange SLA threshold (early warning)
- Red: Breached Red SLA threshold (critical)
Unread message indicator
3. Chat Column (Right)
Opens when an agent selects a case from the Messages column. This is where active conversations happen.
Message Composition:
- Text input with emoji support
- Attachment options (if enabled for the channel)
- Templates (pre-approved messages)
- AI-powered features if Copilot is enabled:
- AI Summary (problem statement, personal info, client sentiment)
- AI Translation (real-time message translation)
- AI Contact Reason suggestions (auto-suggestion)
Available Actions (Top toolbar):
- Attend: Assign the case to yourself (moves case from Waiting to Attending)
- Discard: Remove the case without resolution (adds to discard count in analytics)
- Unassign: Return the case to Waiting status for another agent
- Transfer: Move the case to a different queue/agent or unassign case
- Add contact reasons: Categorize the case (can be done before or after resolution)
- Download case: Export conversation history and metadata
- View case info: Access detailed case information panel
- Resolving Cases:
- Click "Resolve case" when the customer's issue is addressed
- Select one or more appropriate contact reasons from the configured list (depending on the Contact Reasons settings)
- The case is automatically moved to Case Archive
Conversation Tools (Side panels):
Case Info panel:
- Case info data & Contact info data
- Previous case references (if reopened)
Notes panel:
- Add internal notes visible only to agents and managers
- Track important details or actions taken
- Notes persist across case reopenings
- Not visible to customers—strictly for internal use
Key Concepts
Understanding Cases vs. Conversations:
- Case: A support ticket or customer service interaction managed within the Helpdesk system. A case represents the part of the user interaction with a human agent. Anyway, navigating to previous messages you can see the complete interaction from initial customer contact through resolution, regardless of how many messages are exchanged or how long the interaction spans.
- Conversation: A series of consecutive messages within the same chat channel. Conversations start whenever there have been more than 24 hours of silence or when a template message is sent to the end user by the business. During active escalation to an agent, no new conversation is started. Multiple conversations can occur with a customer if the customer returns after periods of inactivity.
Note: In Analytics and reporting, you'll see both "Cases" and "Conversations" as distinct metrics. Cases represent the support ticket lifecycle managed by agents, while Conversations are defined by messaging continuity (24-hour windows). A single case may contain multiple conversations if there are extended periods between customer messages.
Example: A customer contacts support on Monday about an order issue (Case #1 begins, Conversation #1). After the agent responds, 48 hours pass with no reply. When the customer responds on Thursday, this creates Conversation #2 within the same Case #1. The case remains open throughout.
Organizational Structure & Settings
Helpdesk Inbox is structured hierarchically:
- Organization: Represents the client account—the top-level entity containing all projects, queues, and users.
- Project: A container that groups conversations, queues, and settings. Projects typically represent different business units, brands, or service lines within an organization.
- Queue: A subset of a project where incoming customer requests are distributed. Each queue belongs to only one project and can be assigned specific agents, SLA thresholds, and handling rules.
Organization Settings
Admins and managers can organize their teams here. They can add or remove agents, reassign them to projects and queues, and create or manage templates. This section is divided into six areas:
- Overview Page: Change the organization’s name and access a shortcut to the monthly analytics overview. Also quick access to Hubtype Platform Terms of Use.
- Accounts: View the number of user accounts, divided into Agents, Managers, and Admins. Tabs allow switching between roles. Information includes name, email, and current status (available, busy, away, offline).
- For agents and managers, there are buttons to assign/unassign queues or projects, edit user settings, or delete accounts.
- For admins, only the edit button is available.
- Projects: View and manage projects created within the organization.
- Search projects by name or create a new one.
- The project table shows project name, assigned managers and agents, and the number of queues.
- Selecting a project opens its settings (general settings, assigned managers, queues, contact reasons). From here, admins can configure the SLA timer, create contact reasons, and assign team members.
- Webhooks → Helpdesk - Webhooks(more detailed)
- A mechanism that lets your system receive automatic, real-time notifications whenever a specific event occurs in the helpdesk. Instead of manually checking for updates, the system sends an HTTP request to the URL you configure, containing details about the event.
- Webhook: An HTTP POST request sent from the helpdesk to the configured customer URL.
- Set the target URL where your system will receive the notifications (must accept HTTP POST requests and parse JSON).
- Select which events to listen to by checking one or more options:
- New Case: Triggered when a new case is created, includes case details.
- New Message: Triggered when a new message is received, includes message details.,
- Case Resolved: Triggered when a case is marked as resolved
- Case Assigned to Agent: Triggered when a case is reassigned (includes previous and new agent data)
- Case Transferred to Another Queue: Triggered when a case is moved to another queue
- Use the "Test Webhook" button to send a test event and confirm your system receives notifications correctly.
- Each webhook sends a JSON payload with relevant event data to your configured endpoint.
- Best practices: Always use a secure HTTPS endpoint, log every event received for tracking, and return 200 OK status to confirm successful delivery.
- Templates: Create, view and manage message templates that agents can use during conversations.
- The template table shows the template title, an info icon for details, the assigned folder, and the last update date.
- Search templates by name or filter by folder.
- Click "NEW TEMPLATE" to create a new template with or without variables
- Name: Enter the template name
- Template text: Write the template content. Variables can be added using {{1}} for the first variable, {{2}} for the second, and so on (e.g., "Hi {{1}}, this should be done by {{2}}")
- Choose a folder: Assign the template to an existing folder or create a new one by clicking "+ New Folder"
- Templates can be organized into folders for easier navigation and management.
- Selecting a template allows you to edit its content, assign it to specific folders, or delete it.
- Contact Info Fields
- Define custom information fields that agents can add to the Contact Info panel during conversations.
- These fields help agents capture and organize important customer information (e.g., order numbers, membership IDs, email addresses).
- Click "+ New info field" to create a new custom field.
- Existing fields are displayed in a list with options to edit or delete them via the Actions column.
- Fields can be customized based on the organization's specific needs and customer data requirements.
Project Settings Configuration
This configuration demonstrates a comprehensive customer service management setup with sophisticated SLA monitoring and case assignment capabilities. Managers and Admins access these settings via the gear icon next to each project.

Service Level Agreement (SLA) Configuration
Response Time Thresholds:
- Orange SLA threshold: To be configured by the Organization (e.g., 1 minute) - serves as an early warning indicator when cases are approaching critical response times. Helps agents prioritize before cases become urgent.
- Red SLA threshold: To be configured by the Organization (e.g., 2 minutes) - marks the critical service level breach point that directly impacts overall service quality metrics. Cases reaching this threshold are SLA failures.
- SLA Target: To be configured by the Organization (e.g., 80%) - establishes the operational goal where 80% of all cases must be attended to before reaching the red threshold, setting a clear benchmark for service excellence.
Case Lifecycle Management
Case Reopening Policy:
- Max threshold time to reopen a case: To be configured by the Organization (e.g., 1 day) - if a customer contacts support again within this timeframe after case resolution and the bot decides to escalate to a human agent, the system intelligently reopens the previously resolved case rather than creating a duplicate, ensuring conversation continuity and better tracking.
Case Status Thresholds:
- IDLE threshold: To be configured by the Organization (e.g., 4 minutes) - automatically marks cases as idle when customers don't respond within this timeframe, allowing agents to prioritize active conversations and clear their Attending queue.
- Discard threshold: To be configured by the Organization (e.g., 10 minutes after idle) - cases exceeding the idle time are automatically discarded to maintain queue cleanliness and prevent stale cases from accumulating.
Resource Allocation
Agent Capacity Management:
- Concurrency threshold: To be configured by the Organization (e.g., 3 cases) - defines the maximum number of simultaneous cases an agent can handle before their status automatically switches to "busy," preventing overload and maintaining service quality. When an agent reaches this limit, auto-assignment stops sending them new cases. The bot decides the target queue of the case and If the case is going to be automatically assigned or the agents will have to manually assign the cases.
Note: An agent that is assigned to different projects of different queues will become busy when they reach the minimum number of cases assigned between the thresholds of the different projects. - Project availability threshold: To be configured by the Organization (e.g., unlimited) - sets the maximum number of waiting cases for this project; primarily used for IVR deflection strategies to prevent queue overflow.
Advanced Features
Auto-assignment capability: To enhance agent productivity, the system automatically assigns new cases to available agents when they become available or when a case enters the waiting list while an agent is available. This eliminates the need for manual case assignment, allowing agents to focus on customer interactions rather than case selection.
Assignment When an Agent Becomes Available
When an agent switches their status to available, the system automatically assigns autoassignable waiting cases to them until they reach their configured workload threshold.
To determine how many autoassignable cases the agent can still receive, the system compares their busy threshold (the minimum number of cases required for the agent to be considered busy) with their current case assigned count. This threshold is taken either from the agent’s personal settings or, if applicable, the lowest threshold among the projects they belong to.
The current case count may include:
- Only attending cases (default)
- Both attending and idle cases, if organization setting enabled.
The assignment limit is simply the difference between the busy threshold and the current number of cases.
Next, the system looks for cases that meet all of the following criteria:
- Are waiting to be assigned,
- Are not test cases
- Have automatic assignment enabled. (The bot decides if the handoff will create an auto assignable case or not)
- Belong to queues that the agent is assigned to,
- Have not been previously attended by that agent. So if the agent manually unassigns an autoassignable case, the case will not be autoassigned to him back.
- Webchat cases where the user is offline If the “Auto-assign cases with user offline” project setting is active.
Eligible cases are ordered first by queue priority (high → medium → low), and then by the age of the last unanswered message (oldest first).
Cases are assigned in this order until the agent reaches their busy threshold or there are no more eligible cases to assign.
Assignment When a Case Enters Waiting State
When an autoassignable case enters the waiting state (whether newly created, unassigned, transferred without a destination agent, or reopened), the system attempts to assign it to the least busy available agent in the case’s queue.
Assignment can be triggered in several situations:
- When a case is created or updated and is eligible for automatic assignment.
- When a case becomes unassigned and remains in waiting state.
- When a case is transferred to a queue without a specific destination agent.
Agent Selection Logic
To determine the best agent, the system filters for agents who:
- Are available,
- Are assigned to the case’s queue
- Have not previously attended the case.
For each eligible agent, the system computes a busy rank:
- Number Attending cases → 60 points each
- Number Idle cases → 40 points each
- Random value between 0 and 10 (used to break ties and distribute load evenly)
Agents are sorted by this busy rank in ascending order, and the case is assigned to the agent with the lowest rank.If no agent is available, the case remains waiting.
Inbox (Case Management by agents)
Pre-conditions
- Agent must be logged into Hubtype Helpdesk
- Agent must be assigned to at least one queue within a project
- Projects and queues must be properly configured with SLA thresholds and contact reasons
- For WhatsApp cases, the WhatsApp Cloud number must be integrated
The incoming cases are based on three statuses:
- Waiting: Cases entering queues where the agent has visibility and are waiting to be picked up (first notification to the agent).
- Attending: Cases that the agent has assigned to themselves and is currently responding to.
- Idle: Cases that the agent has responded to but the user hasn’t been responding after the limit set in IDLE Threshold Time in Project Settings. Once the user replies, the case automatically returns to Attending status.
Whenever a new message arrives in a queue where the agent is assigned, it appears in Waiting first. This notifies agents that a customer has reached out and is waiting for an answer. Agents can immediately see:
- Name or alias of the customer
- Preview of the message content
- Project and queue assignment
- Channel (e.g., WhatsApp, webchat)
- Whether it's a new conversation or an open case
- SLA timer showing urgency level
Key Actions Available to Agents
- Assigning a Case: Selecting a case from the Waiting status and clicking "Attend" (or "Assign to me")
- Replying: Writing text in the chat window, with the ability to send attachments or templates.
- Transfer: Agents can transfer a case to another queue or unassign the case.
- Resolve: Closing a case, which triggers a window to select the appropriate typification (contact reason). One or more contact reasons can be selected.
- Case Details: Viewing conversation history, User ID, channel, and adding internal notes.
Examples or Use Cases
Use Case 1: Agent handling a new customer inquiry
Scenario: A customer sends a WhatsApp message asking about their order status.
Workflow:
- The case appears in the agent's Waiting queue with an orange SLA indicator
- Agent clicks the case and selects "Attend"
- Case moves to Attending status
- Agent reviews the AI Summary showing: "Customer inquiring about order #12345 delivery date"
- Agent checks Case Info to see if this customer has previous interactions
- Agent responds with order tracking information using a Template
- Customer confirms satisfaction
- Agent clicks "Resolve case" and selects contact reason: "Order Status Inquiry"
- Case is archived and appears in Case Archive with all conversation history
Use Case 2: Manager configuring queue settings
Scenario: A manager needs to adjust SLA thresholds and assign new agents to a queue.
Workflow:
- Manager opens Inbox and navigates to Projects and Queues column
- Clicks the gear icon next to the relevant project
- Adjusts Orange SLA threshold from 1 minute to 2 minutes
- Enables auto-assignment for the queue
- Sets concurrency threshold to 3 cases per agent
- Clicks on specific queue settings
- Assigns 3 new agents to the queue
- Saves changes
- New configuration takes effect immediately for incoming cases
Use Case 3: Agent transferring a complex case
Scenario: An agent in the general support queue receives a technical question requiring specialist knowledge.
Workflow:
- Agent is attending a case about API integration issues
- Agent clicks "Transfer"
- Selects "Technical Support" queue from the dropdown
- Clicks "Confirm Transfer"
- Case moves to the Technical Support queue's Waiting status
- Technical specialist receives the case with full history and the agent's note
Best Practices
For Agents
- Always review Case Info and conversation history before responding to reopened cases
- Add internal Notes for complex cases to help other agents if the case gets transferred
- Select accurate contact reasons before resolving—this data drives reporting and insights
- Use AI Summary to quickly understand customer intent without reading entire conversation history
- Monitor your SLA timer to prioritize urgent cases (red and orange indicators)
- Leverage templates for frequently sent messages to maintain consistency and speed
- If you need to step away, turn on Away Mode rather than leaving cases in Attending status
For Managers/Admins
- Regularly review SLA thresholds to ensure they align with customer expectations and team capacity
- Keep queues organized and balanced—avoid having too many or too few agents per queue
- Maintain a well-structured contact reason taxonomy for cleaner analytics (use categories and subcategories)
- Enable auto-assignment to eliminate manual case distribution and speed up response times
- Configure appropriate concurrency thresholds based on channel type
- Set realistic IDLE thresholds that give customers time to respond without cluttering agent workspaces